
Hello Simple Stories friends, this is Gloria Parra here today with a fun and festive layout featuring the beautiful Simple Vintage Holly Jolly collection. As soon as I saw this vintage-inspired collection, I knew I had to create something magical with its adorable icons and cozy holiday vibes. For this layout, I decided to make the ornaments the star of the show! I love the gorgeous patterns and pops of color they bring to the page. Let me walk you through how I created this layout so you can make your own festive masterpiece!

I started my layout with the beautiful plaid patterned paper as my background—it adds such a cozy, festive feel to the page. Next, I layered the subtle teal polka dot patterned paper from the Vintage Basic kit on top. I cut this piece to 11 ¼ x 11 ¼ inches to create a clean background, letting just the right amount of the plaid pattern peek through around the edges.

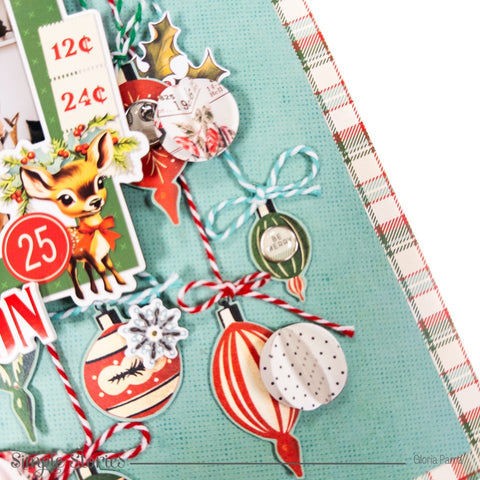
Since I fell in love with the ornament patterned paper as soon as I opened my kit, I knew I had to make them a focal point. I decided to fussy cut a bunch of the ornaments to use as embellishments on my layout. If you’re not a fan of fussy cutting, don’t worry—this collection has you covered! You can find plenty of ornaments in the embellishment packs, sticker sheets, and chipboard pieces, making it easy to add these festive elements to your projects without the extra effort.

Nevertheless, cutting the ornaments wasn’t quite enough for me—I wanted even more dimension and a unique touch for this layout. So, I turned to the 6x8 paper pad and cut 1-inch circles from some of the patterned papers. Using these circles, I created my own origami style ornaments to give the page a handmade, three-dimensional effect. This simple technique added so much texture and personality to my page!

To create these sphere ornaments, all you need to do is punch four 1-inch circles from the same patterned paper, fold each circle in half, and then adhere the folded pieces together to form a 3D sphere. It’s such an easy yet impactful technique! I placed five of these dimensional ornaments on top of the fussy cut ornaments, and I absolutely love the way it turned out. The combination of flat and 3D elements adds so much texture and interest to the layout.

To bring my ornaments to life, I grabbed three colors of baker’s twine—red, teal, and green which adds a playful finishing touch. I perforated small holes at the tops of my ornaments and threaded the twine through, making them appear as if they were hanging from the top of the layout. The combination of colors and textures gives the design a charming, homemade feel that I absolutely adore. It’s such a simple detail, but it makes the ornaments look so realistic and adds a beautiful handmade touch!

Next, I added my photos to the gorgeous chipboard frame from the collection, which perfectly complemented the festive vibe of the layout. To make it stand out, I adhered the frame to the center of my layout using foam adhesive. This added dimension and allowed some of the ornaments to be tucked underneath the frame, creating a layered and cohesive look. I love how foam adhesive gives the layout depth and makes the ornaments feel like they’re floating around the photos!

To make the layout even more festive, I added two fun banners to the top corners of the page. These playful accents bring extra color and movement to the design, perfectly tying everything together. For my journaling, I tucked a journaling tag right at the top of my photo frame. It’s the perfect spot to add my story while keeping the focus on the photos and ornaments.

To finish my layout, I used the Tis the Season foam sticker, which I placed at the bottom of my photo frame to create a bold and festive title. For the final touches, I added some deco brads to the centers of a few ornaments, giving them a little sparkle and dimension. I also sprinkled a few snowflake embellishments (stickers and chipboard pieces) onto some of the other ornaments, adding a frosty, wintery feel.
I hope you guys love this layout as much as I loved creating it! Fussy cutting can be so fun, and I encourage you to give it a try to bring those ornaments to life on your own projects. If you’d like to see the process in action, I have a YouTube video where I walk you through every step of putting this layout together. Thank you so much for stopping by and spending some time with me today. Until next time, happy crafting!
—Gloria Parra


0 comments